HOW TO USE FILTERS ON THE APPLICANT TRACKING SYSTEM (ATS), DOWNLOAD CVs, AND EMAIL MULTIPLE CANDIDATES AT ONCE
In today’s competitive job market, employers like you rely on Applicant Tracking Systems (ATS) to streamline recruitment processes. One powerful feature that significantly enhances efficiency is the effective utilisation of filters. By harnessing the filtering capabilities of an ATS, employers can easily navigate through a pool of applicants, download CVs, and even reach out to multiple candidates simultaneously via email.
Understanding and utilising ATS filters is a quick learnable skill for modern recruitment professionals. Search filters are lovely little helpers that aid in introducing direction and assisting with searches focused on a base. Using filters, you can prioritise candidates that fit a particular parameter you’re searching for.
In this article, we will explore how you can leverage filters on the ATS to your advantage, mainly when listing a job and once candidates have started applying. This way, you can optimise your hiring workflow and uncover the perfect match for your organisation.
– Log into your employer account
– Click on the outward-facing arrow on the extreme left to expand the side panel

– Click on “All Jobs” to view all the jobs posted on your account
– Click on ‘Candidates’ right under the preferred job title. The figure beside ‘Candidates’ represents the total number of applications received.

The next page redirects you to the applications. On the right side, You’ll find the swim lanes and the filters.

The filters allow you to sort the applications received based on the job requirements.
To view more applications per time, set “currently viewing” to either 30 or 50.


A minimum of one field is required to utilise the filter. This means you can choose to sort using only ‘Highest Qualification’, ‘Years of Experience’ and so on.
After selecting the filter(s) of interest, scroll back up to see the result. It shows the number of applicants who meet the requirements inputted in the filters.

HOW TO DOWNLOAD CVs AND EMAIL CANDIDATES EN MASSE
Now that you have the hang of using filters, let’s take a look at how to download multiple CVs and email candidates, saving you time and the stress of downloading individually.
- After utilising the filters, the page brings only applications that fit the filters you applied.
- To either email the candidates, download their profiles and CVs en masse, or perform all simultaneously, check the box beside each profile.
- Alternatively, since all the profiles displayed are filtered results, check the ‘Select All’ box to select all the profiles shown on that page.

- Click on the 3 vertical dots or ‘Bulk Actions’ to download CVs, profiles or email selected candidates.

NOTE: You can only perform one of these functions at a time. Also, there can be as many pages as possible depending on the number of applications and the relevance of the profiles after filtering. You are advised to set the number of views per page to 30 or 50.
- To download CVs and Profiles, click on the applicable dropdown. Please note that you can only perform each function one at a time.
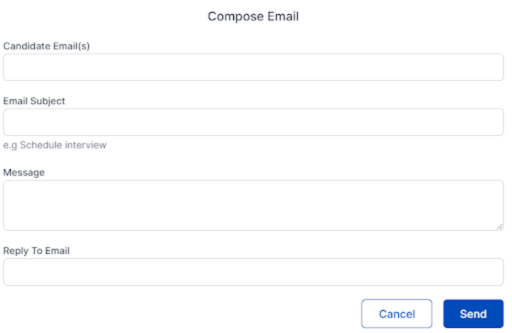
- To Email candidates, check the ‘Select All’ box, click on ‘Bulk Actions’ or the 3 vertical dots and select ‘Email Candidates’. Include your preferred email address in the ‘Reply To Email’ box.
- For suitable profiles, you can move them to ‘Suitable.’
- You can move unsuitable profiles to ‘Not suitable’ just above the “Bulk Actions” icon.

- Candidates who meet your requirements and are being considered for an interview can be moved to “scheduled for interview”, which can be found on the right-hand side of your screen when you click on “Swim lanes.”

- When you have eventually hired the right candidate(s), kindly move the profile(s) to ‘Hired’. Other options, such as “Rejected” and “Shortlisted”, can be used as you see fit.
- In a situation where you have about 5 qualified candidates who aced the interview and need just one candidate for the role, you can add the remaining 4 profiles to the candidate pool.
NOTE: It is essential to name the candidate pool after the job title to make sure everything is clear, e.g. Customer Service Pool.
HOW TO ACCESS CANDIDATE POOLS
A candidate pool is a collection/database of profiles of potential candidates for a specific job role. It allows you to save and organise the candidates who meet your requirements and contact them when the position becomes available.
- To access candidate pools, click the outward-facing arrow on the extreme left to expand the side panel.

- Click on Candidate Pools to either create a new Pool or access existing pools.

There you go. You are all set up for an easier and more efficient hiring process. By effectively using filters on an ATS, downloading CVs efficiently, and utilising email capabilities, you can optimise your hiring process, save time, and identify the ideal candidates for your organisation’s needs. Embrace the power of ATS filters and take complete control of your recruitment efforts.